

How To Partition 1tb Hard Disk In Windows 7
Z7_3054ICK0KGTE30AQO5O3KA30N0
hp-concentra-wrapper-portlet
![]() Actions
Actions
HP PCs - Division and Naming Difficult Drives (Windows 7)
This document applies to HP and Compaq PCs with Windows seven.
Agreement drives, partitions, and volumes in Windows seven
A partition is an surface area of a hard disk that tin be formatted and assigned a drive letter. On a hard disk, a volume is a formatted principal partition or logical drive. The terms partition and volume are frequently used interchangeably.
HP and Compaq computers with Windows 7 have hd drives that contain at least two partitions: the main partition for Windows and your work, and a recovery partition to restore the computer back the mode it came from the factory. Here is a list of some of the partitions you may discover on your hard drive:
-
The main partitioning, commonly labeled with the letter C, contains the system files, program files, and usable file storage space.
-
A recovery partition, commonly drive letter D and labeled RECOVERY, contains system recovery information in case the files on the C partition are damaged or unusable.
-
A subconscious partition may exist called SYSTEM. A SYSTEM partition is used by Windows to store protected files for troubleshooting and should not be altered.
-
Your computer may also take a partition called "HP_TOOLS". If then, this partition contains HP tools for UEFI that you tin can utilize to aid troubleshoot boot problems or test for hardware failures.
circumspection:When using the steps in this certificate, do non delete the Organization, Recovery or FACTORY_IMAGE partitioning or use information technology for file storage. Doing and then may foreclose boot troubleshooting or recovery in the result your figurer encounters a major problem.
Adding a new drive letter in Windows 7
To create more storage space or to view another drive, add a new bulldoze letter to the computer using i of the following methods:
-
Install an additional hard drive - If you demand more space for photos, videos, music, or other files, add a new hard deejay drive or USB storage device. An additional hd can be within the computer (internal) or external, attached to a USB connector on the reckoner. When you add a new storage device, Windows automatically assigns a new letter.
note:
To add an internal hard drive, the computer must have an empty drive bay. Most mid tower or larger desktop PCs have infinite for one or more than boosted difficult drives. Nearly all notebooks, Slimline, and AiO computers do not accept space for an internal bulldoze.
-
Partition the existing drive - If you do not need more file storage infinite but would like to view another drive in Windows, create another sectionalisation on the existing hard deejay. This might exist useful if you need to share files on a drive just want to prevent access to your personal files by keeping them on another bulldoze.
This method does non add more space, but re-allocates some of the empty infinite on the existing difficult disk into another partition. This infinite is then treated as another bulldoze and labeled with its ain bulldoze letter.
Creating a new segmentation in Windows vii
In order to re-allocate empty space on your hd by creating more partitions or volumes, the hard disk must contain unallocated space that is not part of an existing partition. Shrink the volume on an existing drive to create unallocated space, and then create and format a hard disk drive sectionalisation.
-
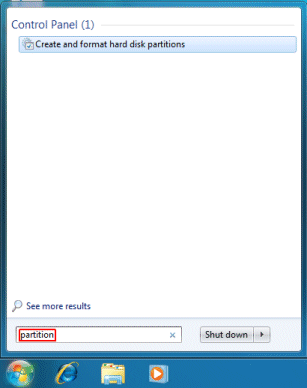
To open the Disk Management tool, click Start
 . In the Search field, type Partition. Then click Create and format hard disk partitions.
Figure : Search results for Partition
The Disk Direction tool opens and displays data virtually the data storage devices on the computer.
-
To create unallocated space on the drive, correct-click the drive you want to partition. For near applications, select the C: bulldoze.
And then click Compress Book...
caution:
Practise not apply the Recovery or FACTORY_IMAGE partition to create a new partition. Doing so might prevent the HP Recovery Manager from recovering the computer when the data on the C: division is damaged.
Effigy : Shrink Volume...

-
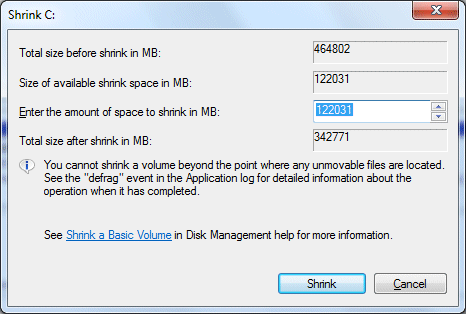
Do not make whatever adjustments to the settings In the Shrink window. Click Shrink.
Figure : Shrink C: window
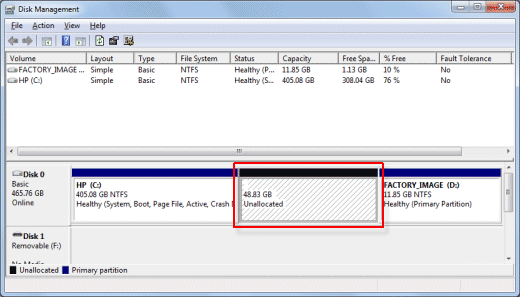
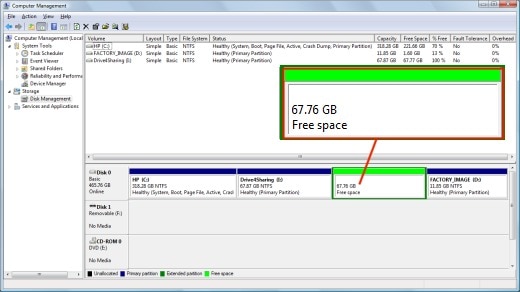
When the Shrink is complete, the new segmentation displays in the Deejay Management utility as Unallocated infinite.
Figure : Disk Direction window with unallocated space encircled in red
-
Right-click the new partition. In the menu that displays, click New Simple Volume...
Figure : New Simple Volume...

-
The New Simple Volume Wizard displays. To keep, click Next.
-
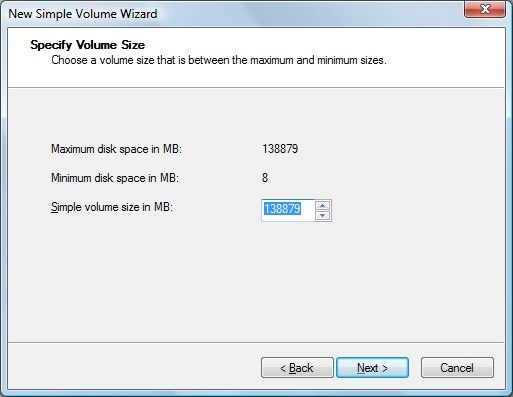
The Specify Volume Size window displays. Blazon in the book size, or click Next to take the default setting.
Figure : Specify Volume Size window
-
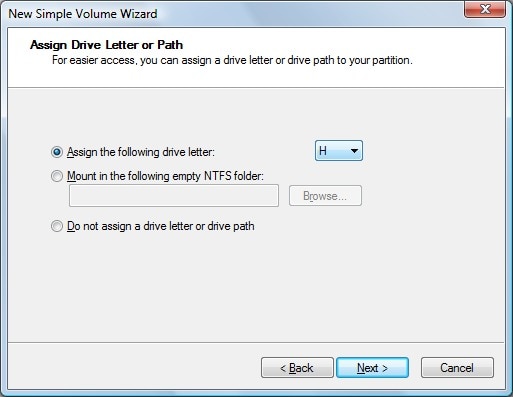
The Assign Drive Letter or Path window displays. Select a drive letter of the alphabet and click Next.
Effigy : Assign Drive Letter or Path window
-
The Format Partition window displays. To name the drive, blazon a proper noun in the Volume characterization box. Then click Side by side.
annotation:
Practise not select Perform a quick format or Enable file and folder compression.
Figure : Format Partition window

-
The settings window displays. Click End.
Figure : Completing the New Simple Book Magician

-
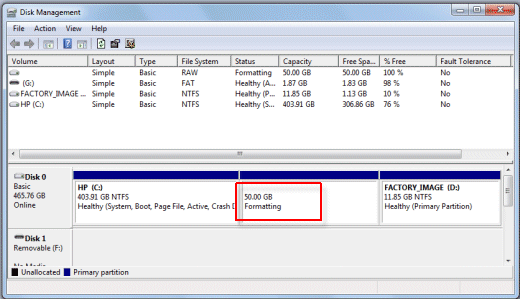
The Disk Management utility displays, showing the formatting progress.
Figure : Formatting
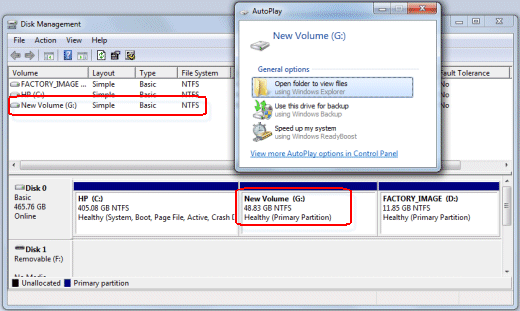
When the format is complete, the new drive shows in the Disk Management utility.
If the AutoPlay window displays, click the X in the upper-correct corner to close information technology.
Effigy : New book
Changing a drive letter in Windows 7
The messages C through Z tin can be assigned to each drive on your figurer. The system partition is usually labeled with the letter C, while the letters A and B are reserved for floppy disk drives or removable drives. If the computer does not have floppy disk drives, y'all can assign A and B to volumes.
note:Some MS‑DOS and Windows programs make references to specific drive messages. If you change a drive letter, some programs that you have installed on your hard disk drive might not work correctly. You lot cannot change a drive letter if the drive is either a system division or a kick sectionalisation. If yous become an error, the partition or drive you are trying to change might be in employ. Shut any program or window that is using the sectionalization or drive and try again.
Consummate the following steps to change a drive letter.
To open up the Disk Management tool, click Start
Figure : Search results for Partitioning
The Disk Management tool opens and displays information about the information storage devices on the computer.
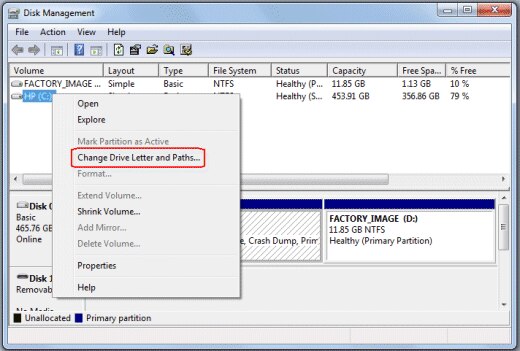
Right-click the partition or drive you desire to rename and then click Change Bulldoze Letter of the alphabet and Paths...
Figure : Change Drive Letter and Paths...
In the Change Drive Letter window, click Change.
Figure : Modify Drive Alphabetic character window with Change highlighted

In the card, select the new drive alphabetic character. Then click OK.
Figure : Alter Drive Letter window

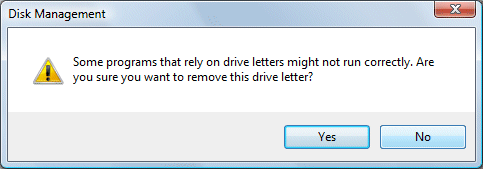
The Disk Direction circumspection message is displayed. Click Yeah to keep.
Figure : Deejay Management caution message
Removing a drive letter of the alphabet in Windows 7
Storage space tin can be cleared and accessed on your reckoner by removing drive messages. A drive letter can exist deleted by using the Disk Management tool.
circumspection:Deleting a volume erases all the data on information technology. Back up any data you want to keep before deleting.
-
Back up any information you desire to keep from the drive you desire to delete.
-
To open the Disk Management tool, click Beginning
. In the Search field, blazon Partition. And then click Create and format hd partitions.Figure : Search results for Partition
The Disk Management tool opens and displays data nearly the data storage devices on the figurer.
-
Correct-click the bulldoze alphabetic character you want to remove. Then click Change Bulldoze Letter and Paths...
Figure : Change Drive Letter of the alphabet and Paths...
-
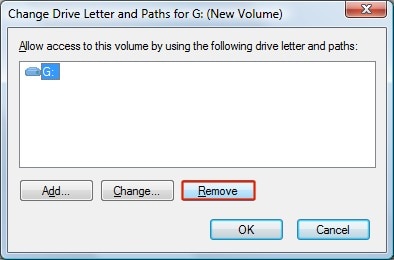
In the Change Drive Letter window, click Remove.
Figure : Change Drive Letter window with Remove highlighted
-
The Disk Management caution message displays. Click Aye to go on.
Figure : Disk Management circumspection message

The bulldoze letter disappears. To use this hard bulldoze space again, continue to the next section to remove the partition.
Removing a partitioning in Windows 7
Storage space can be cleared and accessed on your estimator past removing partitions. A partition tin be deleted from the Deejay Management portion of the Reckoner Management window when you select Delete Volume, click Delete Partition, and and then add the unallocated infinite to some other disk.
caution:Deleting a volume erases all the data on information technology. Back up whatsoever data y'all want to keep before deleting.
-
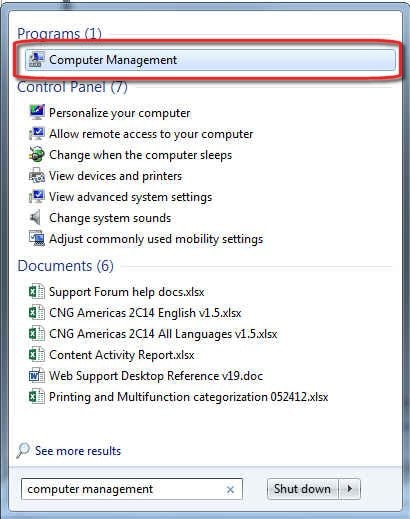
To open the Deejay Management tool, click First
. In the Search field, type Computer Management. Then click the Computer Management option from the search results.Effigy : Search results for Reckoner Direction
The Calculator Management window opens.
-
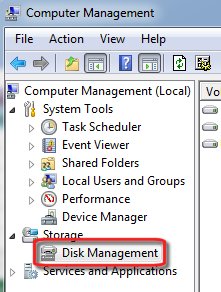
In the menu bar on the left of the Estimator Management window, select Disk Management.
Effigy : Disk Management
The partitions of your calculator are displayed.
-
Right-click the volume or partition you lot desire to delete, and and then click Delete Volume...
Figure : Delete Volume...

-
If you have backed up the data you desire to keep, click Aye.
The drive letter disappears and the partition is labeled as Free space.
Figure : Free space in the partitioning
-
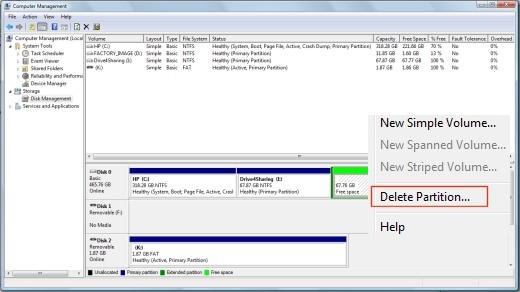
Right-click the costless infinite. In the menu that displays, click Delete Segmentation...
Figure : Delete Partition...
Now the space is shown as Unallocated.
-
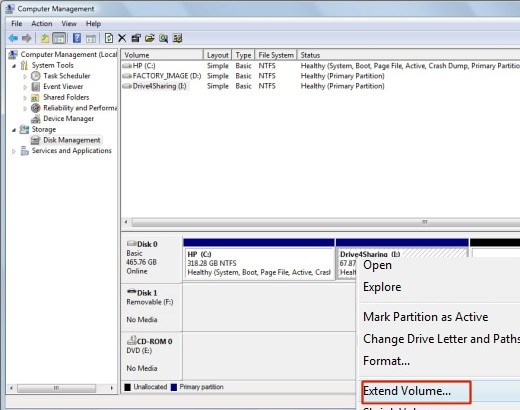
Right-click the drive to which you lot want to add the unallocated infinite. In the menu that displays, click Extend Volume...
Figure : Extend Volume...
-
The Extend Volume Wizard displays. Click Adjacent.
Figure : Extend Volume Magician

-
The Select Disks window displays. Do non change any settings. Click Next.
Figure : Select Disks window

-
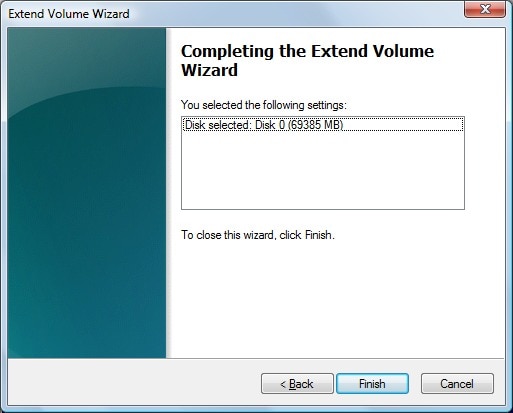
Click Finish.
Figure : Completing the Extend Volume Wizard
The unallocated infinite can now exist used.
Support related to partitioning and naming hard drives in Windows 7
Source: https://support.hp.com/lv-en/document/c01861974
Posted by: alanizyoutims.blogspot.com
0 Response to "How To Partition 1tb Hard Disk In Windows 7"
Post a Comment